Troubleshooting & FAQs
Water Detector Configuration:
The device will not function until it has been configured per these instructions.
- Remove the cover of the device by pulling off the tape. You will notice a bag with 4 screws sitting in the battery holder. Put that to the side for now.
- Install (3) AAA batteries while minding proper orientation (we recommend Duracell or Energizer for maximum longevity). The flat end of each battery should be placed against the spring side of the associated target battery slot.
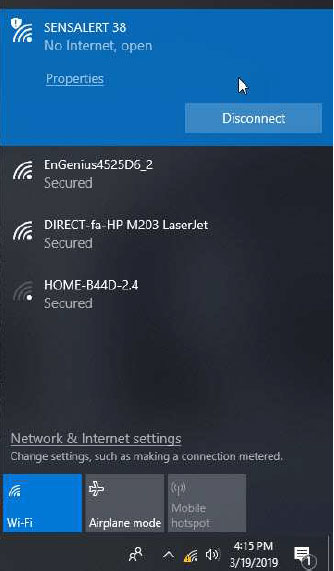
- Bring up the available Wi-Fi connections from your personal computer or mobile phone.
SensAlert XX should be shown in the list of available seen Wi-Fi devices

(This example is using a Windows 10 PC. This device shows as SensAlert 38)
- Connect to sensAlert XX. (XX meaning the numbers will be different)
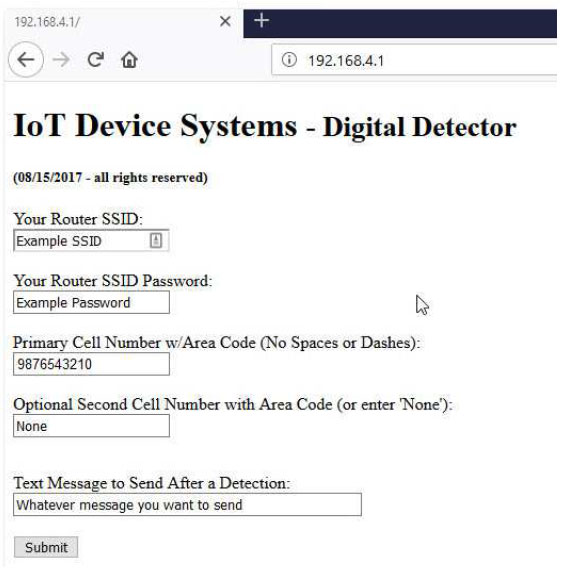
- Go to your preferred internet browser (Example: Explorer or Firefox) after your PC or cellular phone has connected to sensAlert and in the command bar, type in:
192.168.4.1
- Press Enter. The following configuration page should appear.

- Type-in your router “SSID” exactly, making sure that the proper upper and lower case is used. The SSID is your Wi-Fi service name that all of your devices connect to.
- Click on or tab to the next field and type-in your “SSID Password”. Remember this has match your Wi-Fi service.
- Click on or tab to the next field and type-in your 10-digit personal cell phone number with area code first and no spaces or dashes in the following format:
Example: 7571234567
- Click on or tab to the next field and type-in an alternate second cell phone number in the same fashion as step 9. If a second cell phone is not desired enter “None” (default).
- Click on or tab to the text message field and type-in the alert message you would like to receive after a detected alarm condition. For example: “A water leak has been detected under the kitchen sink”
- Click on “submit”.
The following message will appear if the configuration was successful.

- Test the device by setting it on a wet paper towel or napkin. Never submerge the device in water. You should receive a text message if the device is set up and functioning correctly. Also you want to perform this test near the location that you want to monitor to make sure you don’t have any Wi-Fi interference.
- At this point you can put the cover on and install the 4 provided screws.
- If anything goes wrong with this setup, pull the batteries and wait 3 minutes before re-installing the batteries again to start over. Remember that this device will only work as long as your router SSID and router password have not changed. If you do change your router, your password, or even your cell phone number, you will need to reprogram the unit. Again to reset the device just remove the batteries for 3 minutes and start back at step 3.
Operation:
So now what do you want to monitor at this time? If it’s your water heater pan, your washing machine, under your sink, dishwasher; whatever you’re interested in monitoring, place SensAlert near that area. Remember the way this device works is the probes need to get wet so give some thought to how the water would flow if there were to be an issue. One other thing to remember is you can’t put the sensor probes on a metal surface. This will cause the device to think there is a water leak. To get around this you can put a piece of tape down on the metal surface and then place the sensor probes on the tape.
When an alarm condition is detected, the device will send out the text message you programmed for this device. You can have as many SensAlert devices as you want for as many water concerns as you have.
It is recommended to test the device every 6 months for proper operation and battery voltage. The batteries will last for several years with normal use, but as you know batteries can start leaking without any notice. Hopefully you will never need an alert but if you do you have a better chance of being protected.
To download and print these instructions, click here.


